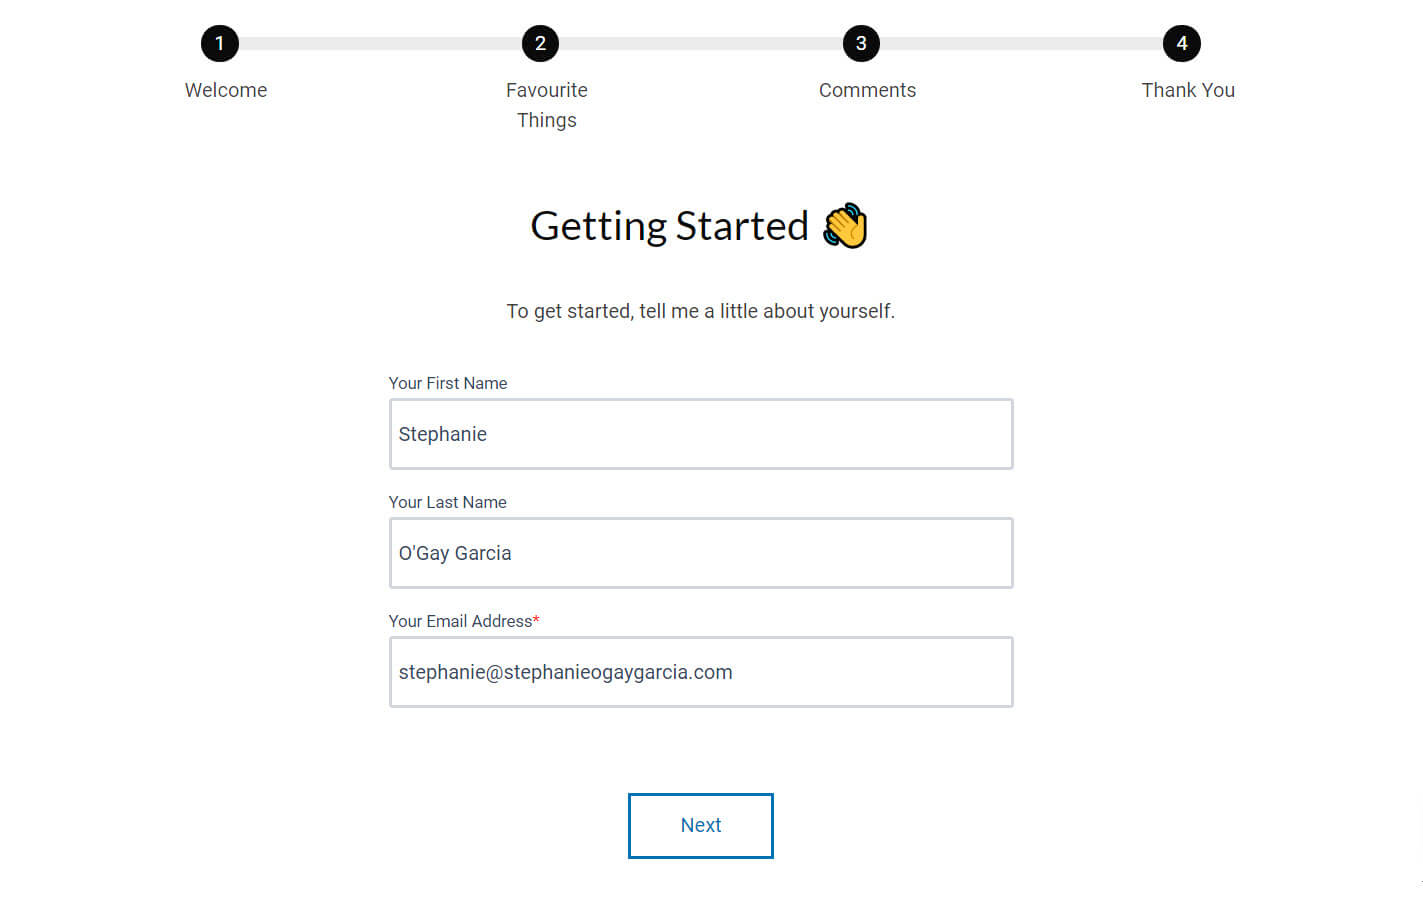
The HubSpot Multi-Step Form Slider custom module lets marketer's create a multi-step form experience in HubSpot in minutes. You can view a demo of the module here.
Breaking your form into several steps creates a less overwhelming experience for the user when you need to request a lot of information.
Module Features
- Smooth, single-page, multi-form action
- Responsive: drag it anywhere on your template, it adapts to all column and screen sizes
- Add as many slides as you like, the module adjusts automatically
- The form submits each time you click "Next" so that you can build form abandonment workflows
- Uses HubSpot's form validation at each step
- The email address transfers from one slide to the next, so you can set the email as a hidden field after the first slide
- Allows you to customise the form width and colours
- Styling (fonts, form fields) adapt to your website's theme
- Support: have a question? I'm happy to help :)
- Customisation: need even more functionality? I can add more features on request! Add logic, a calculator, smart content based on responses, icons instead of numbers... etc.
Frequently Asked Questions
Where can I get the module?
Due to limited time available to provide support and maintenance for the module, I have made the decision to remove it from the HubSpot Marketplace. However, I am still available for custom development and you can tell me more about your project here.
Can I add slides without email addresses?
The module was created in such a way that it takes the email address on the first slide, copies it and pastes it in the second slide onward to make sure that all form submissions are tied to the contact record. Therefore, by default you must have a visible email address field in the first form slide (that cannot be a progressive field) and a visible or hidden email address on the rest of the slides.
It is possible to submit forms without email addresses and link them to a contact record at a later date if you've enabled the "Allow submissions without email addresses to create contacts option".
If you wish, you can disable the code that checks for the email and copies it to the next slide by adding // in front of lines 25, 26, 27, 28, 29 and 30, like this:
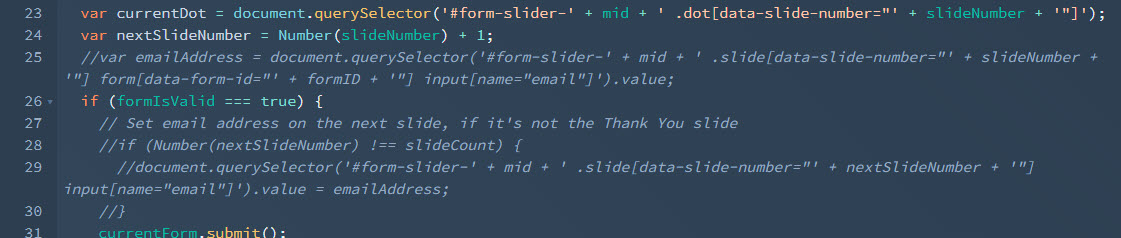
Note that line 26 has not been disabled. Then click on "Publish" in the upper right-hand corner and you will no longer have issues trying to add slides without emails.
Note that by disabling this:
- The form submission will not be associated with a contact until they've filled out their email address on one of the slides.
- If the form has cookies disabled or the user doesn't accept cookies, you risk slides without email addresses linking to the right contact record.
Why can't I move back and forth among the slides?
Each slide uses an embedded HubSpot form and submits that form when the "Next" or "Submit" button is clicked. Because it's an embedded for, that slide just displays the thank you message ("Thank you for submitting the form") when you go back to it. Therefore I've disabled the option to do so.
If you would like a custom solution that allows you to go back and forth, get in touch. I can either remove the functionality of submitting the form when "Next" is clicked or I can create a custom coded form.
How many slides can I add?
As many as you like! However, it might start to get a little crowded at the top if you add in too many. There is a customisation option that allows you to remove the titles that appear at the top below each dot if this is the case.
Is the module responsive?
Absolutely! :) It looks great on mobile. Check out the demo here.
Can it be used for a calculator?
Not out of the box, but I can create a custom solution for you if you'd like to get in touch.
Troubleshooting Common Issues
When I click on the "Next" button, the module is unresponsive.
In most cases, this is an issue with the email address not being listed correctly on the next slide. HubSpot requires that an email address be submitted on each form in order to link it with the correct contact profile. What the slider does is get the email address entered into the first slide, copy it and then paste it into the remaining slides.
In order for this to happen, the email address field must appear on all slides and not be a progressive field, although it can be set to "Hidden" on the second slide onward (for a workaround, see above).
How To Use The Module
Once the module has been added to your template, you can click on it to access the module's options. On the left hand sidebar you'll see four sections that will allow you to customise the module.
Note that the font for the header and the form formatting should be pulled directly from your website's theme to match the rest of your content.
1/ Slides
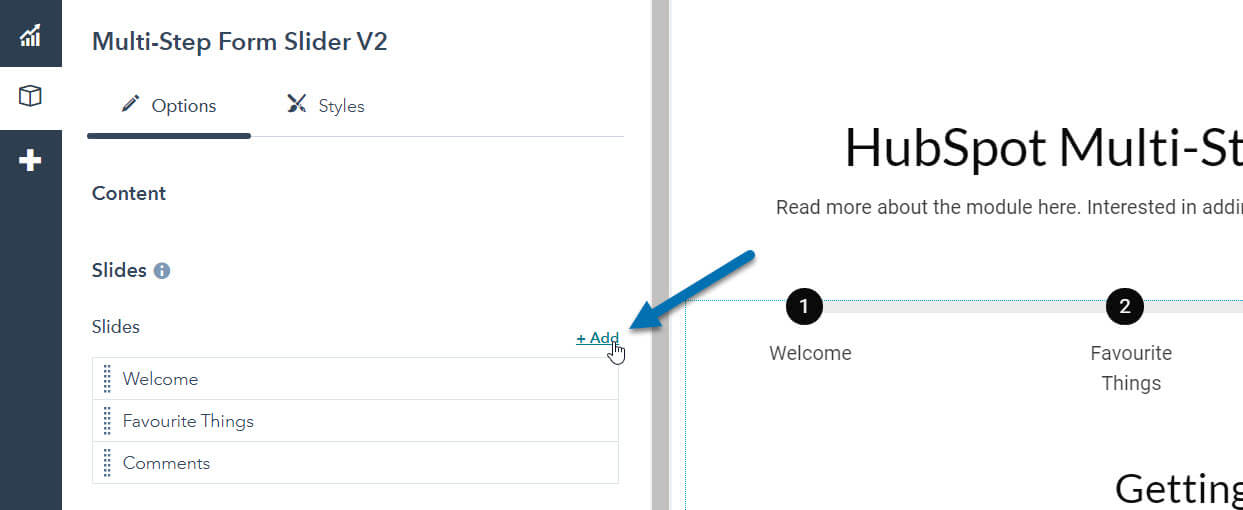
Each time you click on "+ Add", it will allow you to add a new slide to your multi-step form module. When you create or edit a slide, you'll see the following three important fields:
- Slide Title: the name that appears under the slide number at the top
- Slide Content: a Rich Text module that allows you to add any form of content above the slide
- Form field: which form you would like to use on that slide
Some important notes on the form:
- Choose the option to "Display an inline thank you message" for the form, but note that this will not be visible to the user.
- You only need to add a visible Email form field to the form on the first slide. After the first slide, the email address will automatically be pulled from the previous slide so you can set the field to Hidden on other forms (note that you'll need to remove the Required option first).
2/ Last / Thank You Slide
The last slide is very similar to the Slides above in that it lets you update the slide title and content, but does not have a form. In the Last Slide Content area, you can add in your thank you message.
3/ Colours
If you click into the "Customisation" area, you can customise most of the colours on the module:
- Background Colour Style/Background Colour: this is for the overall background colour. You can choose whether you'd like a flat colour, a gradient (multiple colours) or to add in your own CSS (e.g. for a background image)
- Progress Bar Colour: the colour of the progress bar as you move from one slide to the next
- Dot Colour: the colour of the dots that appear on the progress bar
- Visited Dot Colour: the colour of the dots that appear on the progress bar once that slide has been completed
- Dot Number Colour: the colour of the numbers inside the dots
- Slide Title Colour: the colour of the title for each slide in the progress bar
- Slide Background Colour: the background colour behind the content on each slide
- Button Colour: the form's submit button colour.
4/ Other Customisations
Below the colour sections, you can also customise other aspects of the custom module:
- Module Inner Spacing: this is the spacing within the module
- Content Width: this is the maximum width at which the content will display,
- Slide Inner Spacing: this is the spacing within each slide
- Adaptive Height: if this is enabled, the module will adapt to the height of the content on each slide. Otherwise, the height of the longest slide will be used.
- Hide Progress Bar Header: hide's the title for each slide in each progress bar. If you have many slides this may come in handy as not all of the slide headers will fit above.
- Content Error Message: if the user tries to click on "Next" but not all fields are completed, this is the error message they will see.
When you have finished with your customisations, be sure to click on "Apply" at the bottom to make sure they're reflected on your page!